
Angular is a technology that comes with various different functionalities and the lifecycle hook is one such special functionality. Angular development service providers use Angular lifecycle hooks that execute at specific moments during the component lifecycle This concept is very beneficial as generally, Angular handles directives and components when developers use it to create components or directives or update them or delete them. But with lifecycle hooks coming into the picture, the developers can get better control over the application. For getting this control, the developers add a specific hook method with ng as a prefix to the directive or component class.
To know more about Angular lifecycle hooks, how many of these hooks are available in the market and what can these hooks offer to the application, let’s go through this blog.
1. Angular Lifecycle Hook
Angular lifecycle hooks are a set of specific phases in the life of an Angular component or directive. They start with the initialization of the root component of the app, followed by the creation and rendering of its child components, and then their respective child components or directives. In Angular, components form a tree structure. Once the application loads all these components, Angular initiates the rendering process for the view. To achieve this, Angular needs to check and verify the input properties of the application’s components, render the projected content of the application, review and evaluate the data expressions and bindings, and more. In addition to this, Angular also removes unnecessary components from the DOM.
The Angular application executes all these events to make the application work smoothly, and Angular component’s lifecycle hooks are responsible for carrying out these events. Angular invokes Angular lifecycle hooks, also known as callback functions, when specific types of events occur during the lifecycle of Angular components. For instance,
- The ngOnChanges hook in Angular invokes when someone changes the component’s input property.
- When Angular initializes the component for the first time, it enforces the ngOnInit hook.
- Angular invokes the ngOnDestroy hook when it destroys any component.
Angular invokes some of the other hooks during the component life cycle, in addition to the above-listed Angular component lifecycle hooks.
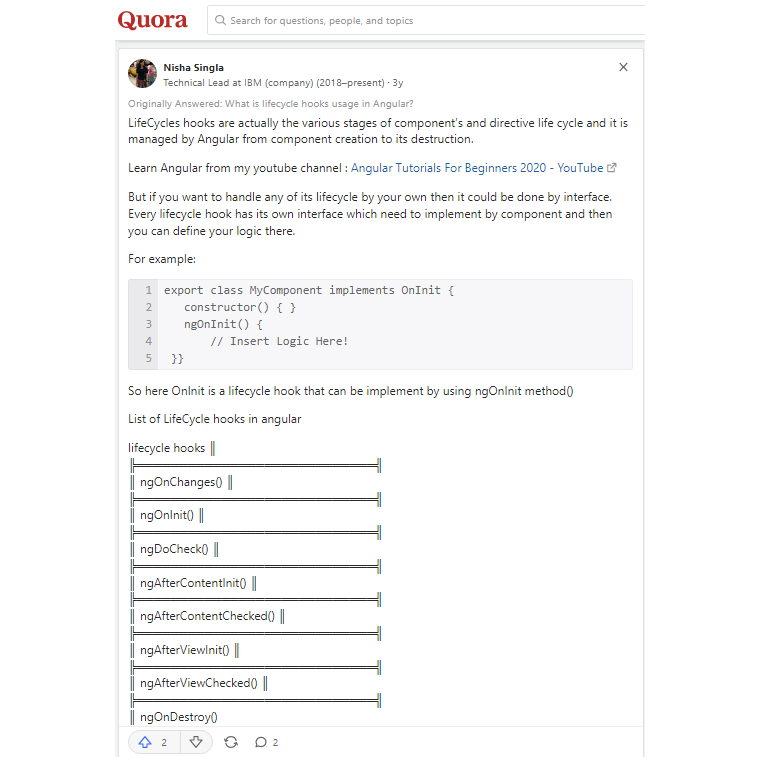
- ngOnChanges
- ngOnInit
- ngDoCheck
- ngAfterContentInit
- ngAfterContentChecked
- ngAfterViewInit
- ngAfterViewChecked
- ngOnDestroy
A Quora user who is working in IBM on Angular LifeCycle Hook.
Now let us go through all the Angular lifecycle hooks in detail.
1.1 ngOnChanges
The very first method is ngOnChanges. Whenever the component creates itself and detects changes in any of its input properties, it invokes this approach. It uses the SimpleChanges object as a parameter, which contains data related to the changes in the input properties. In essence, if a component has received no inputs or is used without any inputs, the framework won’t call ngOnChanges(). This implies that invoking this method requires input from the user.
In addition to this, developers often find ngOnChanges to be a versatile lifecycle hook that proves handy in various use cases. This method is useful when the developer wants to handle specific logic of the Angular application on the received input property in the component.
To understand it in the coding, check out this demonstration.
import { Component, Input, OnChanges, SimpleChanges } from '@angular/core'; @Component({ selector: 'app-my-child', template: `<h3>Child Component</h3> <p>{{ Name }}</p>`, styleUrls: ['./my-child.component.scss'] }) export class MyChildComponent implements OnChanges{ @Input() Name: string = ""; ngOnChanges(changes: SimpleChanges) { console.log('Input properties changed:', changes); } } |
In the above-mentioned code, you can check the console and see that the console.log() is called once the Angular application is opened for the first time.
Now, check the given code below to verify that the received changes object has three distinct keys: currentValue, previousValue, and firstChange. In this context, the developer can modify the name value if they do not intend the added value for the first change, or they can retain the value as “Jone.” To check how this works, let’s go through the code below and see the second case of implementation –
import { Component } from '@angular/core'; @Component({ selector: 'app-my-parent', template: `<h2>Parent Component</h2> `, styleUrls: ['./my-parent.component.scss'] }) export class MyParentComponent { Name: string = 'Hello from parent! My Name Jon'; } |
Now, let’s examine the above-written code. The parent component binds the ‘name’ input property, and it passes the value of the ‘name’ input to the child component using the Input() property. Child component catches the name input property value from ‘Jon’ to ‘Jone’ as you can see output in the console.

Furthermore, when you inspect the console output, you will observe that the received object has undergone a change, as depicted in the image below.

1.2 ngOnInit
After the first ngOnChanges call, the hook calls only once throughout the ongoing component lifecycle. Additionally, ngOnInit() still gets called even when there are no ngOnChanges() being invoked. This is the case when template-bound inputs are not there. This is why developers highly use the ngOnInit Angular lifecycle hook. ngOnInit is the method that enables the developers to set requests to the server in order to load content. For this purpose, the developers can develop a FormGroup to handle the form by that component, set subscriptions, and more. Basically, FormGroup is where the developer can perform any initializations after the component’s construction.
Now, let’s go through some of the key points of the ngOnInit method –
The constructor()
During instantiation of the class, execute this method known as the default class method. Its purpose is to ensure proper initialization of fields within the class and its subclasses.
The Dependency Injector in Angular analyzes the constructor parameters, and when there is a requirement to create a new component instance, the system invokes a new instance of MyClass().And this constructor finds the perfect match of providers for the different types of constructor parameters. Then it reloves the providers and passes them to the constructor.
Besides this, the constructor is called before calling the ngOnInit method, as the constructed() must only be used to initialize class members once but shouldn’t do actual work.
The ngOnInit()
Angular calls this life cycle hook to signal the completion of component creation. Use this function to indicate that Angular has finished creating the component. Additionally, use this method for all types of declaration/initialization logic, as components require initialization at this point. Look at this demonstration of what we discussed here in the following code –
// components/parent/parent.component.ts export class MyParentComponent implements OnInit{ ngOnInit() { console.log("ngOnInIt trigger -- this is parent Component"); } } // components/child/child.component.ts export class MyChildComponent implements OnInit{ ngOnInit(): void { console.log("ngOnInIt trigger -- this is Child Component"); } } |

The above images demonstrate that creating the parent component first and subsequently developing the child component is perfectly alright. And if the user clicks the Update button, the ngOnInit hook will not trigger as it only triggers once.
1.3 ngDoCheck
The next Angular lifecycle hook in the list is ngDoCheck. Developers can use this hook when they want to interpret it as an “extension” of the ngOnChanges method. Developers can use this method when they want to detect changes that Angular won’t or isn’t able to detect. This lifecycle hook is called in every custom change detection, as soon as the methods like ngOnInit and ngOnChanges are called.
Besides this, ngDoCheck is known as the most costly hook as it is called very frequently after every change detection cycle and when it is called it doesn’t matter where the change has occurred. Careful usage of this hook is crucial, as failure to do so may impact the user experience of the application.
To see what we discussed above, let’s go through the following code:
@Component({ selector: 'app-my-parent', template: `<h2>DoCheck Example</h2> <p>Counter: {{ counter }}</p>`, styleUrls: ['./my-parent.component.scss'] }) export class MyParentComponent implements DoCheck{ counter: number = 0; ngDoCheck() { // This method will be called whenever Angular runs change detection for this component. // You can put any custom change detection logic here. // For this example, let's increment the counter every time change detection runs. this.counter++; console.log('ngDoCheck ==>', this.counter); } } |
The above-specified code will give the following result after running it in the application.

1.4 ngAfterContentInit
ngAfterContentInit is a method that is called only one time while the lifecycle of the component is going on, after the first ngDoCheck. After creating the component, Angular projects the external content, and this hook enables developers to access the ElementRef of the ContentChild for the first time.
Check out the demonstration of what we just discussed in the following code:
@Component({ selector: 'app-my-parent', template: `<h2>Parent Component</h2> `, styleUrls: ['./my-parent.component.scss'] }) export class MyParentComponent implements AfterContentInit { @ContentChild(MyChildComponent) childComponent !: MyChildComponent; ngAfterContentInit() { console.log('ngAfterContentInit is Called.'); if (this.childComponent) { // Perform any logic that needs access to the ChildComponent after context initialization. this.childComponent.CallChildComponetMethod(); } } } |
The above code was for the parent component class and now let’s have a look at the child component code.
@Component({ selector: 'app-my-child', template : ` <p>Child Component Content</p>`, styleUrls: ['./my-child.component.scss'] }) export class MyChildComponent{ CallChildComponetMethod() { debugger console.log('This is Child Component Method'); } } |
And let’s take another component for the projection of two components and after projection of child component content in parent component we will call child component method in parent component with the help of ContentChild() property as you can see in above code.

The above screenshot shows that the developer can project the content from the parent to the child component. You can only initialize and access it on the ngAfterViewInit hook.
1.5 ngAfterContentChecked
The ngAfterContentChecked method is another important Angular lifecycle hook that can be called once in the component’s lifecycle after the ngAfterContentInit method is invoked. After that, every subsequent ngDoCheck method carries out the task of checking the content. Angular calls this method after it has already reviewed the projected content in the current digest loop.
To see the demonstration of this method, let’s have a look at the following code:
@Component({ selector: 'app-my-parent', template: `<h2>ViewChecked Example</h2> <p>{{ message }}</p> <button>Update Message</button>`, styleUrls: ['./my-parent.component.scss'] }) export class MyParentComponent { message: string = 'Write message....'; ngAfterViewChecked() { // This method will be called after the view is checked for changes. console.log('ngAfterViewChecked is called.'); } updateMessage() { this.message = 'Updated message'; } } |
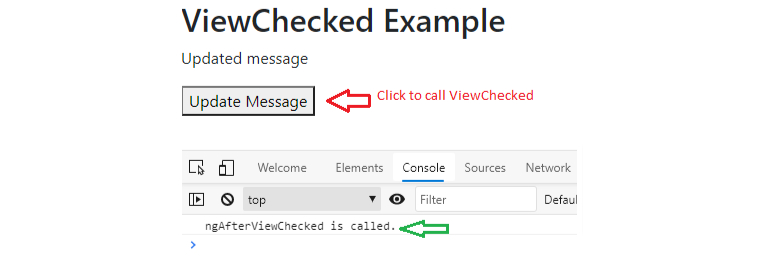
Here if one clicks on the Update button, the lifecycle hook, ngAfterContentChecked will trigger every time with the ngDoCheck hook.
1.6 ngAfterViewInit
ngAfterViewInit is one of the most important lifecycle hook methods to be called one time during the component’s lifecycle, after calling the ngAfterContentChecked method. This hook enables the developers to access ElementRef of the ViewChildren for the first time after the creation of the component. Angular can already compose the component’s view and child view before carrying out this process.
Basically, when the developer needs to load the content on the view component, they can use the ngAfterViewInit hook. For example, if you want to create a chart on canvas elements or set a video player, you can use this hook. To check out how it works, see the following code.
@Component({ selector: 'app-my-parent', template: `<h2>AfterViewInit Example</h2> <button>Change Font</button> <p>Initial text</p>`, styleUrls: ['./my-parent.component.scss'] }) export class MyParentComponent { @ViewChild('myTextElement', { static: false }) myTextElement !: ElementRef; ngAfterViewInit() { console.log('ngAfterViewInit is called.'); this.myTextElement.nativeElement.style.color = 'red'; } changeColor() { this.myTextElement.nativeElement.style.color = 'green'; } } |
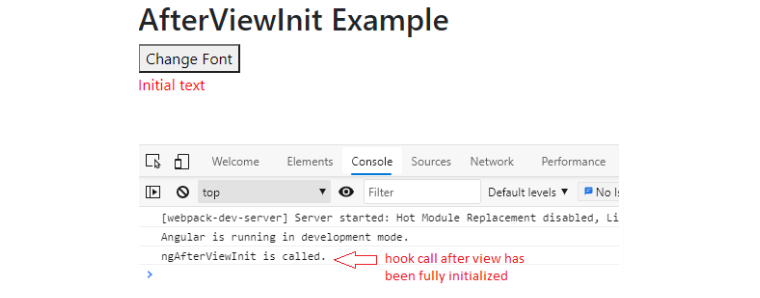
In this example, we have a simple component called AfterViewInitComponent. The component implements the AfterViewInit interface, which provides the ngAfterViewInit method. Angular will call this method after fully initializing the component’s view.
The component also uses @ViewChild to access the DOM element with the template reference variable myTextElement. We set the static option to false to ensure that the ViewChild is queried after the view has been initialized.
The component has a button that triggers the changeColor method when clicked. This method changes the color of the text to green.
When you add and run the code in the application development, it creates the template for the component, and you can easily access it.
1.7 ngAfterViewChecked
ngAfterViewChecked is a method that is called by the developer one time after calling the ngAfterViewInit method and later then it is called after every subsequent ngAfterContentChecked. After Angular finishes checking the component’s views with its child views, it needs to call this lifecycle hook. To check how this method works, let’s have a look at the following code demonstration.
@Component({ selector: 'app-my-parent', template: ` <h2>ViewChecked Example</h2> <p>{{ count }}</p> <button>Update Count</button>`, styleUrls: ['./my-parent.component.scss'] }) export class MyParentComponent { count: number = 0; ngAfterViewChecked() { // This method will be called after the view is checked for changes. console.log('ngAfterViewChecked is called.'); } updateCount() { this.count++; } } |
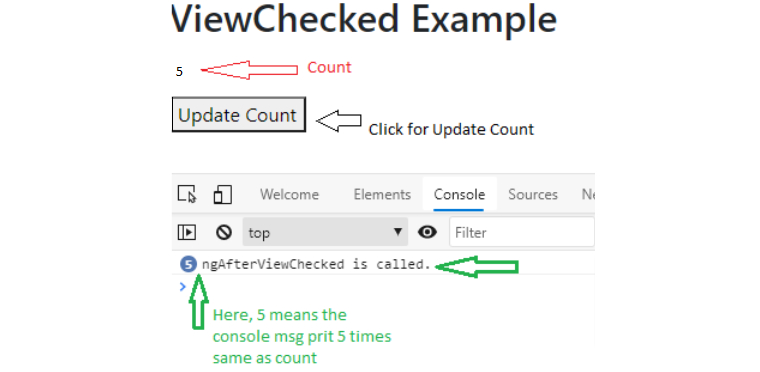
If the user keeps clicking the Update button here, it will trigger the ngAfterViewChecked, ngAfterContentChecked, and ngDoCheck methods every time.
1.8 ngOnDestroy
Angular developers can call the ngOnDestroy method only once, while the lifecycle of the components is still ongoing after Angular destroys it. This stage becomes necessary for informing the entire Angular application that the component is being destroyed, ensuring that no actions related to that particular component will be carried out successfully.
Besides this, the ngOnDestroy method enables one to store all the cleanup logic for the deleted component. For instance, when the user removes any local storage information or unsubscribes observables or stops the timers to avoid memory leaks, this method can be useful.
The developer needs to handle the cleanup logic by using the HostListener decorator because this method is now called when the user refreshes the web page of the application or closes the browser. Let’s explore the following code to understand how to use the HostListener decorator.
@Component({ selector: 'app-my-child', template : `<h2>Destroy Example</h2> <p>Counter: {{ counter }}</p>`, styleUrls: ['./my-child.component.scss'] }) export class MyChildComponent implements OnDestroy{ counter: number = 0; private subscription: Subscription; constructor() { this.subscription = interval(1000).subscribe(() => { this.counter++; console.log('count ==> ', this.counter) }); } ngOnDestroy() { console.log('ngOnDestroy is called') this.subscription.unsubscribe(); } } |
To obtain a comprehensive demonstration of this method and its usage, let’s review the following code that you can add to your application development code:
@Component({ selector: 'app-my-parent', template: ` <button>Call Destroy Component</button>`, styleUrls: ['./my-parent.component.scss'] }) export class MyParentComponent { showDestroy: boolean = true; CallDestroy() { this.showDestroy = !this.showDestroy; } } |
The above code will give the below given output where you can see the updated UI.
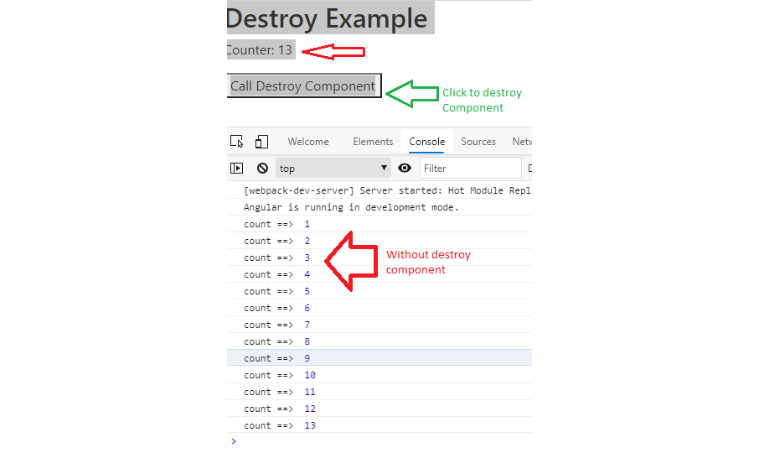
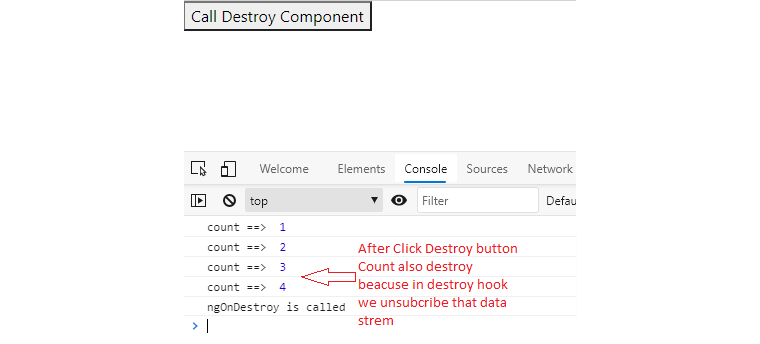
If you click on the Destroy button in this updated UI, it will trigger the ngOnDestroy function, and the function will remove the component from the DOM.
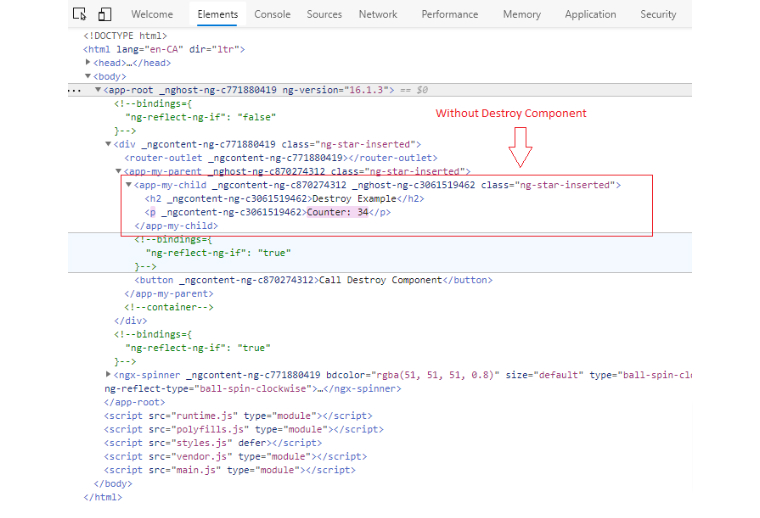
Here is the image that shows the DOM before clicking on the Destroy button.
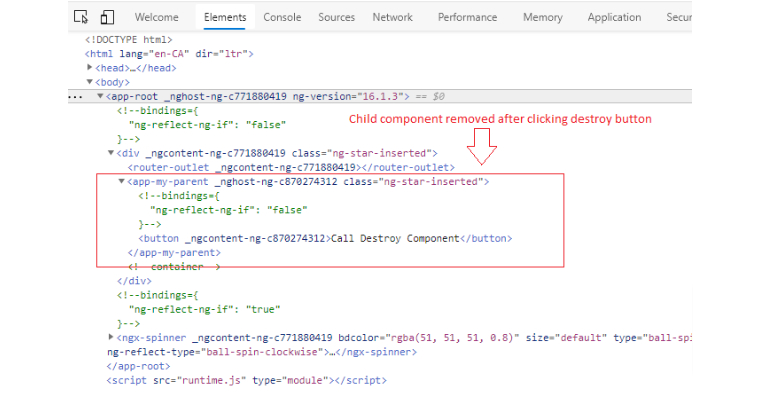
And this is the image of the DOM after the user clicked the Destroy button.
2. Conclusion
As seen in this blog, Angular Lifecycle Hooks is a huge concept and there are many different types of hooks available in Angular. Here we went through all the hooks and their objectives. You saw that when a hook is called, it plays a very vital role in the Angular app development process. Every Angular developer should know how each hook works and what they can achieve by using those hooks and applying them to the logic of application development.
3. FAQ:
What are the Angular lifecycle hooks?
Ans: Lifecycle hooks are a collection of Angular functions that are activated at particular junctures throughout a component’s lifecycle. These methods allow you to execute custom logic or actions at key stages in the Angular component lifecycle.
What is the use of ngOnInit in Angular?
Ans: In Angular, the ngOnInit lifecycle hook operates subsequent to the execution of the constructor and prior to the initialization of the component’s inputs. If the component needs any further initialization, it can be used to do it. Calling services or setting up subscriptions are popular uses of ngOnInit.
Why are lifecycle hooks used?
Ans: With Angular’s unique capability known as “lifecycle hooks,” we can “hook into” a component or directive’s lifecycle event and execute code at that particular moment.




Comments
Leave a message...